
An introduction to the InternetBasics of HTML (5) [Archives:2003/659/Education]
August 14 2003
 |
Academic Head
NCC Education, Yemen Center
Referring to previous lessons, we said that websites are actually HTML files. HTML stands for HyperText Markup Language, the most widely used programming language in formatting Internet websites. There are several versions of HTML. The latest version is HTML 4.0. HyperText here means the text that references another text in a nonlinear method. You click over links in form of words or images to move from one source to another in the Internet. Markup here means putting text, images or pictures along with tables in one page in an understandable way. And finally, Language means programming language. It is worth bearing in mind that there are other languages used in website design but HTML was the first and is still the dominant language.
Tables
In early versions of HTML, tables were not defined, but Netscape provided additional tags to allow tables to be produced and interpreted by their browser. These proved extremely popular and were incorporated in HTML 3.2. All browsers now support tables. Tables allow stronger control over how text is placed on the webpage. This both an advantage and a disadvantage.
If the web designer overuses tables and in particular large tables with many columns, users may not be able to view them as the designer intended. Non graphical browsers can have serious problems with tables.
The general syntax of the tags for a table is as follows:<br><TABLE><br><TR><TD>\r\nTHE FIRST CELL FIRST ROW <TD>THE SECOND CELL FIRST ROW</TR><br><TR><TD>\r\nTHE FIRST CELL SECOND ROW <TD>THE SECOND CELL SECOND ROW</TR><br></TABLE><br>Note\r\nthat the closing </TD> tags are not needed. The <TD> tags work as a column delimiter.
The table we have now is a very plain looking. We need to make it appear more stylish. We can change the appearance of a table by adding more attributes to the tags.
Table Attributes
We can change the border of the table by incorporating the BORDER attribute as follows:
<TABLE BORDER=4>
This will put a border around the whole table and around each cell, producing a grid effect. The width of the border is expressed in pixels.
Another attribute we can use is the ALIGN attribute. We can place a table in the middle of the webpage by adding this attribute as follows:
<TABLE BORDER=4>
The alignment can be left, center, or right. The sizes of the rows and columns will be set automatically by the browser. We can still change this by adding the CELLSPACING and CELLPADDING attributes: as follows:
<TABLE BORDER=4 ALIGN=”center” CELLPADDING=10 CELLSPACING=12 >
The cellpadding attribute specifies the amount of space in pixels that should be allowed between the cell contents and the cell boundary. On the other hand, the Cellspacing attribute, also in pixels, controls the spacing between the cells.
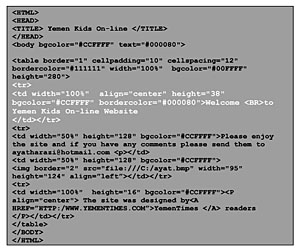
Now we can apply some of these new tags we have just learned to our example. If you check figure1 you will notice the great changes in the way the texts and the image are placed on the page. You can notice that the background of each cell is different from the background color of the table. You can observe that the spaces between the cells (CELLSPACING) and the space between the content of the cells and the border of the cell (CELLPADDING) have been put to make the cell's text and image contents appear in an elegant fashion.
The new code I added to the html file is displayed in fig2. Notice that the code marked in white is assigned for one cell so you can compare to the rest of the code.
Table background
You can make an image as a background of a table. The same thing can be done for the cells. You can make a separate background image for each cell but I don't think that will be a good idea. To add a background picture for a table you add the background attribute to the table tag as follows:
<table border=”1″ cellpadding=”10″ cellspacing=”12″ \r\nbordercolor=”#111111″ width=”100%” bgcolor=”#00FFFF” height=”280″ background=”ayatp.gif”\r\n>
To add a background picture for a cell you add the background attribute to the cell tag as follows:
\r\n<td width=”50%” height=”128″ bgcolor=”#CCFFFF” background=”ayatp.gif”>
You must be sure that the file (ayatp.gif) is indeed available in the same directory of the html file you are opening.
If you have any questions about the lessons please send me an e-mail to ayatharazi@hotmail.com.
——
[archive-e:659-v:13-y:2003-d:2003-08-14-p:education]