

An introduction to the InternetAdvanced HTML (1) [Archives:2003/661/Education]
August 21 2003
 |
 |
 |
Academic Head
NCC Education, Yemen Center
Continuing our lessons in HTML, we will move ahead to the advanced techniques used by web designers. 'Advanced' here means more creative and interactive web pages. Since the beginning of these lessons, we where talking about using static HTML tools. By using advanced HTML tools we can have the web pages react to the visitors clicks. We can read and store information sent by visitors.
Introduction into Forms
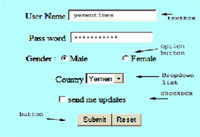
HTML forms are widely used to gather data from users of web pages to be processed by web servers. As we can see in fig 1, an HTML form consists of different objects such as buttons, textboxes, dropdown lists, check boxes, and option buttons.
To understand how to use forms to collect data from visitors, we need to know about the processing cycle for that.
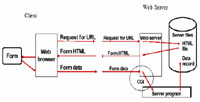
The process starts when the user requests a resource through the browser. This could be done by typing a complete URL, or clicking on a link, or using a search engine. The request for a URL goes to the server using the HTTP protocol. The server responds by sending back HTML file containing the form. This is then interpreted by the browser and displayed as a form on the user's screen. Then, the user fills in the form. Note that a simple HTML form cannot validate this data as it is entered. When the user clicks on the button to return the form, the browser puts together a message containing the form data and sends this back to the server. Fig 2 shows the whole process for that. From the web server viewpoint the interaction starts with the receipt of a request for a resource based on a URL and using HTTP. The server responds to this by locating the resource required, which in this case is an HTML file containing a form. The server returns the HTML form to the browser. This completes the transaction from the server viewpoint.
After the user fills the form, a message may come from the browser to the server using HTTP containing form data and directed to a program. The server will not associate this message with the previous request for the form. The server recognizes that this response needs to be handled by a particular program. This program runs on the web server or in another server. It will require data to be accessed which is located on the server. A response may be sent back to the browser as a confirmation or an error message. The requested program will be the name of a program located within a specific directory or a script file written by a scripting language such as Active Server Pages, Java Scripts , Visual Basic Scripts or PHP. Fig 2 demonstrates the process of using Common Gateway Interface CGI programs to access data.
In case a scripting language was used to access the data, the web server will not need to use the CGI to run. However, the server extensions of the scripting language used must be installed in the web server. Most of web servers support the use of Java scripts, and only Microsoft Internet Information Server (IIS) supports the using of Visual Basic scripts.
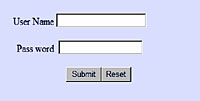
Form Tags
The filling in of an HTML form is carried out entirely by the browser. The web server does not get involved in this process. The browser cannot carry out any detailed validation of the data which the user supplies. HTML forms only have text fields, so cannot detect when a user types a letter when a number is required. This type of validation can only be done when the data is returned to the server. To add a form to a web page we use the form tags as follows: