An introduction to the InternetAdvanced HTML (3) [Archives:2003/665/Education]

archive
September 4 2003
Figure 1
Figure 1
Adnan A. Al-Harazi
Academic Head
NCC Education, Yemen Center

Multiline Text Fields
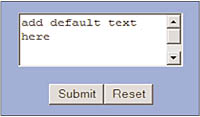
A multiline text field is simply a multi-row version of the single line text field. It is used to return large amounts of text, whilst giving the user some simple editing capability within the field. The user can move freely around the field and change it easily before submitting it. The HTML code for a multiline text field as follows:


The ROWS and COLS attributes define the size of the display for the multiline field measured in characters. The text entered can be larger than this, in which case the field will scroll both horizontally and vertically. When the submit button is clicked, the whole field with its contents is returned. The browser will interpret the above code, along with the form tags, and displays the form as in Fig1.

Design Guidelines
We now have a reasonable selection of tools to create a form. They can be combined with the HTML construction information covered in the previous lessons to produce some very effective forms.
Some useful methods to achieve professional results:

– Use tables to line up buttons.
Radio buttons and other elements can be put in the cells of a table to ensure that they line up neatly.
– Do not overuse graphical buttons
It is possible to over-use graphics in buttons. Every graphic image requires time and bandwidth to display to the user. Most web site customers would rather have a form that displays quickly rather that one which looks pretty.
– Ensure that radio buttons have a common name.
If not, the radio buttons will behave as if they are not grouped. This will cause extreme confusion for the user and return multiple values to the web server and application.
– Ensure that there is only one SELECTED option unless list is MULTIPLE.
If more than one option is SELECTED in a list which is not MULTIPLE, the result is not defined by HTML. The browser will behave in an indeterminate fashion and the behavior is likely to be different with different browsers.
– Do not assume that the browser can validate input.
This is a common misconception. All meaningful validation must be carried out by the application program. This is irritating to users; it means that they may need to go back and correct a single field from a large form when they would expect this to be checked on entry.

Mailto Action
The MAILTO ACTION allows the contents of a form to be e-mailed to the address given. This is occasionally useful for real forms where the volume is low and no server side processing is needed. To send the form data to an e-mail address you change the form ACTION attribute as follows:


It is very important to notice that to submit a form data you have to use a web server and an e-mail client program such as MS-Outlook is installed. You can install a web server in your personal computer and publish your web pages to this local web server. The most common web servers are Microsoft Internet Information Server (IIS) or Apache server. Windows XP comes with small IIS program where you can install it during the installation of Windows or by adding it from the control panel “add or remove programs”. Apache server is free and you can download from many www.apache.org. I prefer to use IIS as a beginner in web designing because it is easy to configure and there are many applications that work with IIS.

IIS Web Services Configuration
To be able to submit forms to web servers, you need to install IIS and configure it to host your web site. If you already have it installed in your system, you go to “control panel” and then to administrative tools to run it. By using the IIS that comes with Windows XP, you can have only one main web site. However, if you have the IIS installed in a W2000 server, you can have as many as you need of web sites hosted in the web server. In Windows XP, the controlling window for the IIS is displayed in Fig 2.
The IIS web server in Fig 2 is hosting one web site that has a title called Default Web Site. If you clicked on this title you see the default files in your web site. Most of these files are not required for your web site when you publish to any host in the Internet. You can find out about the properties of this web site by “right clicking” over the title. By using the properties tab, you can change many attributes of the site. You can change the title of the site to something else. You can check the home directory where the web site files and folders are saved. You can also change the file name of the default home page from index.htm to anything you like, as long as it exists. You can publish your web site to this local web server by simply copying your web site files and folders into the home directory of the default site, by default the directory is “c:\\inetpub\\wwwroot” but you still can change it. After you copy your web site files, refresh the web server to see the new copied files to the right as in Fig 2. You can browse your site different methods. One method is by typing the web site URL which is http://localhost/. Another method is by “right clicking” over the web site title and then selecting “browse”. If you see your home page displayed it means your web server is working and you can use it to submit forms' data to applications or e-mails.
If you have any questions about the lessons please send me an e-mail to [email protected].
Next week: More in Advanced HTML
——
[archive-e:665-v:13-y:2003-d:2003-09-04-p:education]